Old CPE guide
Last updated September 2, 2019 by Meitar M
This explains in detail how to configure Ubiquiti sector clients (e.g. LiteBeamAC or NanoBeamAC) to work with Hub nodes (such as Node 1340). For further support use the #install channel on our Slack.
This is for reference only! New config instructions are here
New config instructions are here
Notable sites that can use this config:
- Supernode 1 (previously SN1 had a different config)
- Node 1340 (33 Saratoga Ave, serving Bed Stuy, Bushwick, Ridgewood, Crown Heights)
- Line of sight to: 40.686017, -73.917494
- Slack rooms: #1340-alerts, #nycha, #bedstuy, #crownheights, #eastwburg_bushwick
- Supernode 3
- Supernode 4
- Most Hubs ( Henry St )
0. Get everything ready
Download the latest version of AirMaxAC firmware to your laptop:
- Go to Ubiquiti’s downloads page
- Select your device on the left (e.g. LiteBeamAC or NanoBeamAC)
- Dowload the latest version of firmware (accept the terms)
Unpack the CPE (LiteBeamAC or NanoBeamAC) and find the following items:
- CPE antenna (the part that has one ethernet port)
- POE adapter (the part that has two ports and one electrical cord)
Make sure you have cables to connect everything:
- Two ethernet cables, Cat5E or higher (can be relatively short ones, a.k.a. “jumper” cables)
- If you have a Mac or similar laptop with no ethernet port, you’ll need a gigabit adapter
Keep a browser tab open with these instructions
1. Connect the CPE to your laptop
There are two ways to connect to the LiteBeam, ethernet or the management radio (gen2 only). The management radio is much easier but you will not be able to do a bandwidth test this way. The management radio is only on for 15 minutes after booting.
Plug in the POE adapter to power it
Connect the POE port on the POE adapter to the CPE via ethernet cable
- A little blue light should come on to show the CPE is powered
- A little blue light should come on to show the CPE is powered
To connect via management wifi-
Look for and connect to wifi SSID like- “LBE-5AC-Gen2:….” or “NBE…” for Nanobeam
Go to https://192.168.172.1 in your browser
You will get an ssh warning “Your connection is not…” – ignore it and click “advanced” to proceed. (This is because the interface uses https)
Log in with username ubnt and password ubnt for a new device
OR Connect via Ethernet
Connect the ETH port on the POE adapter to your laptop via ethernet cable
Right click the wi-fi icon on your laptop and click Open Network Preferences (or go to System Preferences > Network )
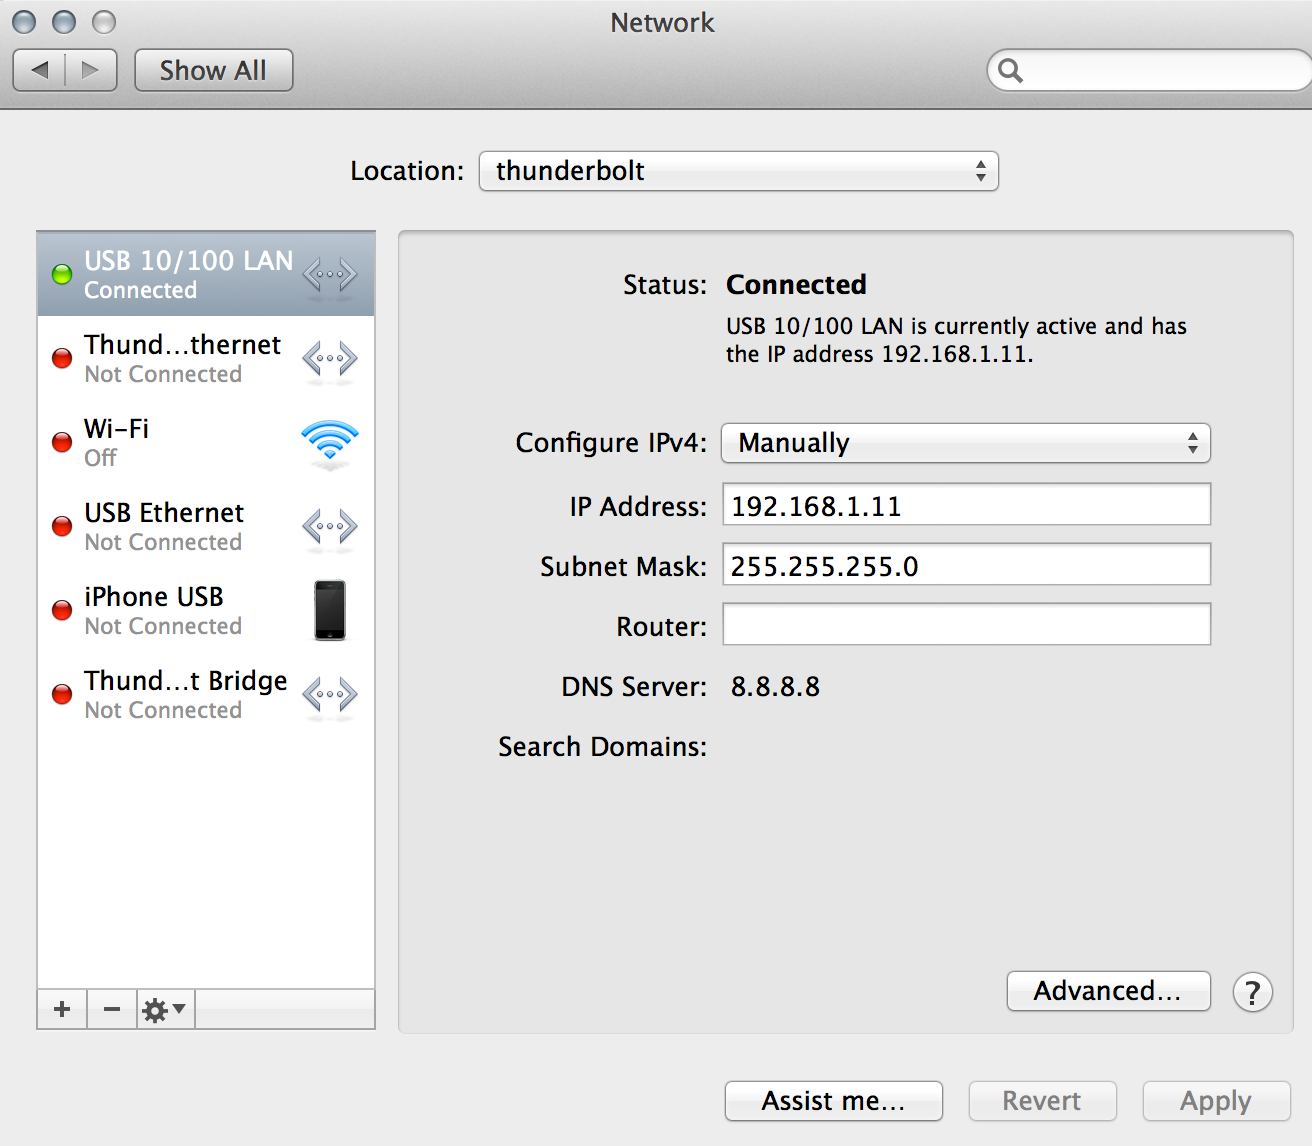
Set your Network Preferences for the ethernet connection (usually called USB LAN, Ethernet, or Thunderbolt Ethernet) to the following:
- Configure IPv4: manual
- IP Address: 192.168.1.11
- Mask: 255.255.255.0
Turn off your Wi-Fi to allow your browser to connect to the CPE (unless of course you are connecting by wifi)
Go to http://192.168.1.20 and use: ubnt as both user name and password if it’s a new device
If the device has already been configured you should use its new settings for IP, user name, and password.
If you’re getting an error along the lines of “Can’t connect to Internet” or “Timed Out”:
- Make sure your Wi-Fi is off and the ethernet connection is green in your Network Preferences
- Make sure you typed “http://” before the IP address (otherwise your browser might think you’re trying to google the IP address)
- Try connecting via the management WiFi instead of ethernet as above.
- If you still can’t connect try hard resetting the device by inserting a pin or paperclip into the little hole above the port and pressing the internal button for about 10 seconds.
- If all else fails, try asking on the #install channel on our Slack
You will get an ssh warning “Your connection is not…” – ignore it and click “advanced” to proceed. (This is because the interface uses https)
2. Flash the CPE with latest firmware
Once you’re logged into the CPE’s dashboard click the “Settings” button (gear icon) on the left to give you: Wireless | Network | Services | System
Go to System > Configuration > Reset to factory defaults, and click Reset
Log in again and go to System > Upload Firmware
Select the firmware file you downloaded earlier and upload it
- The file name usually has the version in it, e.g. WA.v8.5.7.38314.180628.1036.bin
- In the CPE dashboard on the top left you should see the current firmware version number
Reset to factory again as in the first step
Change the password as prompted
3. Change the settings
Once you’re logged into the CPE’s dashboard click the “Settings” button (gear icon) on the left to give you: Wireless | Network | Services | System
Change the settings as follows, or simply download SN2+ hub config file
- Station PtMP
- SSID:
- For 1340: nycmesh-1340-north or …-east or …-south or …-west (depending on where you are)
- For English Kills (former SN2): nycmesh-english-kills-east OR nycmesh-english-kills-west (see pairing below)
- For others see pairing below
- Enable Auto Channel Width
- Antenna 23 - 23dbi
- Slide Output Power all the way to the right for max dBm
- Security: WPA2-AES
- WPA Authentication: PSK
- WPA Preshared Key: nycmeshnet
- Disable Automatic Power Control
- Management IP address [x] DHCP
- DHCP FALLBACK IP change back to 192.168.1.20
- Enable IPV6
- Set IPV6 Address to SLAAC
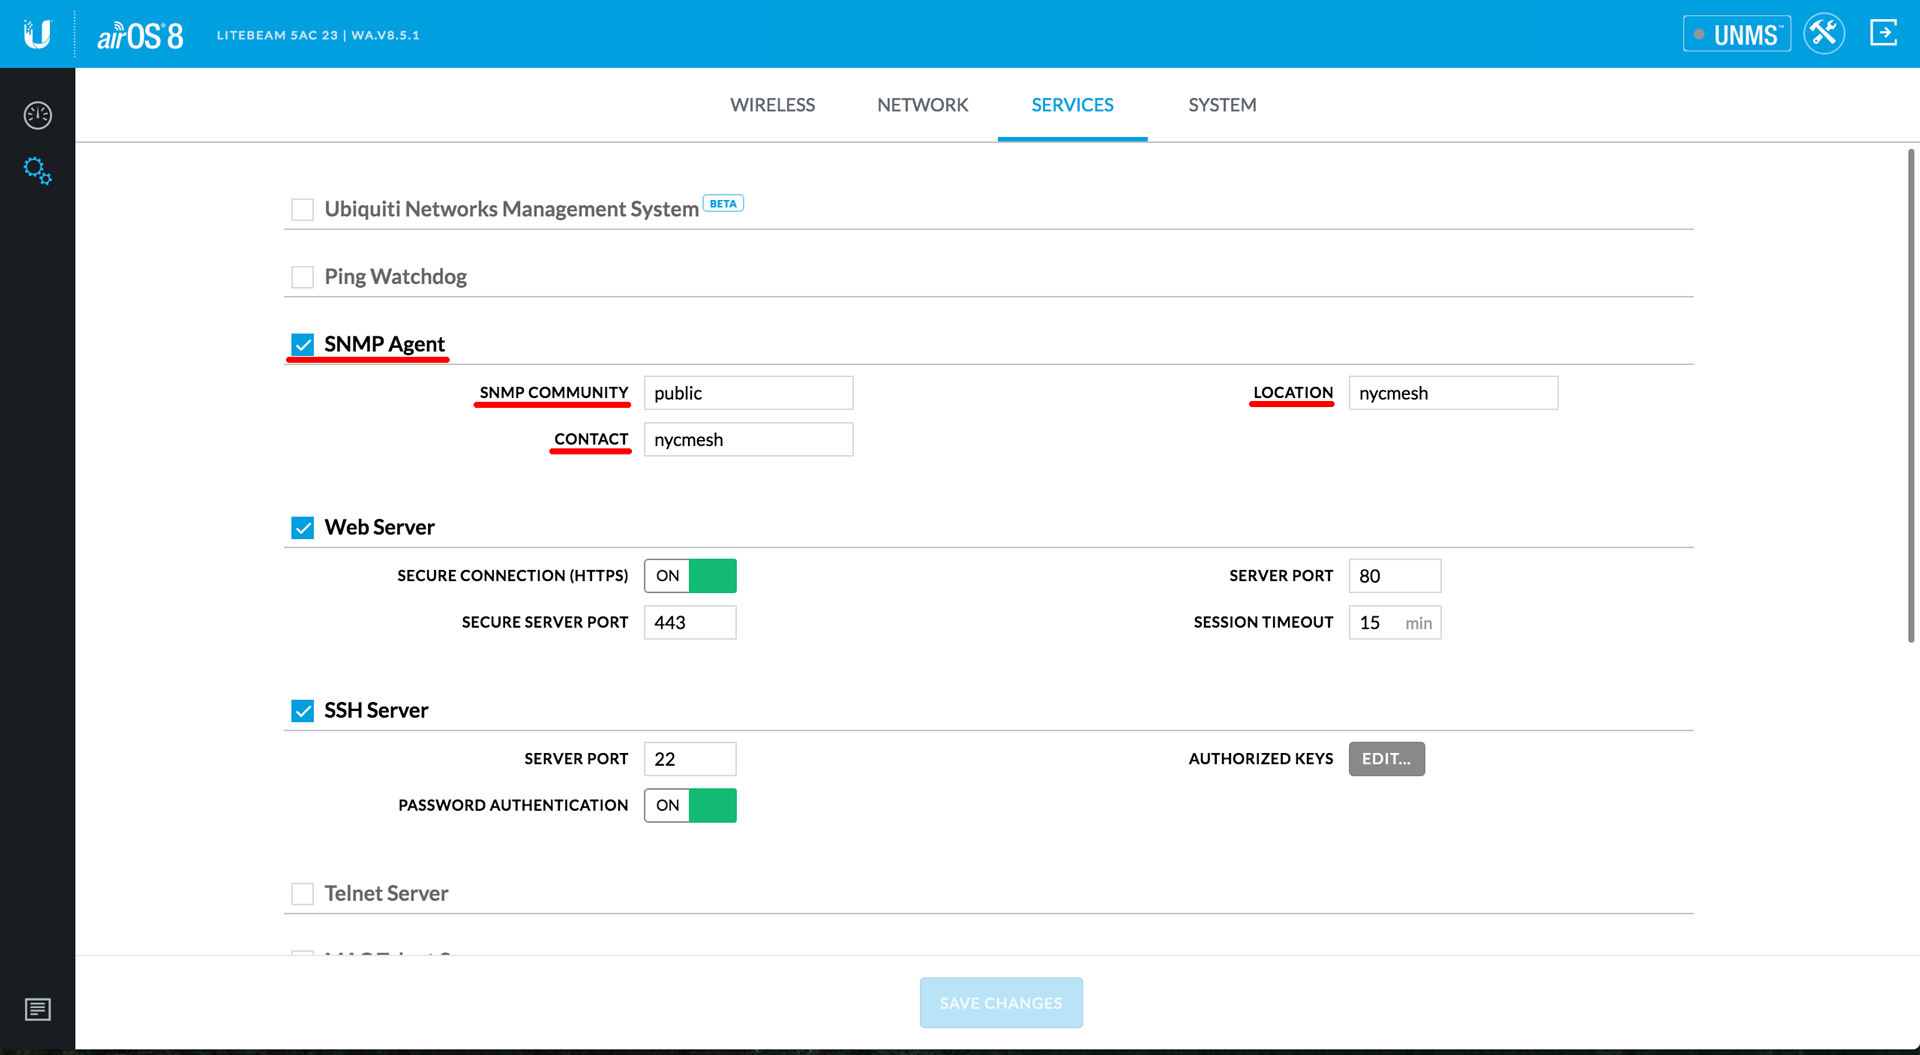
- Enable SNMP Agent
- SNMP community: public
- Location: nycmesh
- Contact: nycmesh
- Device name: nycmesh-lbe-#### (lbe is LiteBeam, nbe is NanoBeam, #### is replaced with your node number)
- If you’re using a Gen 1 Litebeam you might need to activate UNII rules (which allows the device to use DFS channels as long as no radars are using them, like Gen 2 devices do). Ask for support on Slack #install channel on how to do so.
IMPORTANT: Click SAVE CHANGES when you’re done!
4. Pairing
Once this device pairs it will get a different IP address using DHCP. To stay logged in, use the management wifi and log in at https://192.168.172.1
Supernode 2
In the “Wireless” settings click “Select” and choose the strongest “nycmesh-english-kills” signal. The strongest signal has the lower number. -80db would be very weak, -50db would be very strong.
1340
Same as above but find the strongest nycmesh-1340-X signal. The sectors are aligned with the street grid of Bed Stuy, not true north.
5. Antenna Alignment
There is a visual level built into the antenna. Make sure the bubble is in the middle.
There is a “tools” icon in the upper right of the interface. Click this and select Antenna alignment.
- The sound option is very helpful for this.
First align the antenna by pointing it directly at the supernode.
Now move it slightly up or down to get a stronger signal.
Once you have the vertical alignment, do the same by moving the antenna horizontally.
6. Test speed
To get internet from the CPE you need to set your laptop’s network configuration to:
IPv4:using DHCP (“automatic” setting on some machines)
If the device is paired with the supernode it will automatically get an IP address in our range- 199.x.x.x
Test the speed by browsing to speedtest.net
A good speed is over 50Mps. We have been getting 60 to 120Mbps so far.
It is possible to get 200Mbps from SN2 if you are close with good line of sight.
Note: You must have a gigabit adapter to get over 100Mbps. If you don’t have a gigabit adapter the maximum speed is going to be under 95Mbps.
If the speed is under 20Mbps explain to the member the limitations (Netflix standard streaming is 5Mbps).
It is not good to install if connection is less than 10Mbps as it won’t reliably play video.